watching nginx server status

Once you have turned on nginx stub_status and enabled access from localhost:

  location /nginx_status {
    stub_status on;
    access_log off;
    allow 127.0.0.1;
    deny all;
  }

You can now watch the the status realtime with:

watch -n1 'curl localhost/nginx_status 2>/dev/null'

A solution to the umask problem: inotify to force permissions

(via en.positon.org)

Finding a good solution for sharing files between Linux users is a nightmare.

If using a unique UID is not a problem, it's the most simple solution. All clients access files with the same UID. This way you cannot know who does what, and users cannot fine tune access rights.

Remove all messages from exim queue

exim -bp | awk '/^ *[0-9]+[mhd]/{print "exim -Mrm " $3}' | bash

`exim -bp`, lists the messages in queue, which is piped through awk, printing to output "exim -Mrm {MessageID}" which is further piped into bash for execution.

Dec to hex converter

(via www.maxi-pedia.com)

Dec to hex converter (or a dec to hex convertor) is a tool used to convert numbers expressed in the decimal format into hexadecimal or short hex format. Dec to hex conversion is common when working with web sites and graphics...

EDAC - Error Detection And Correction

(via www.kernel.org)

The 'edac' kernel module goal is to detect and report errors that occur
within the computer system running under linux.

ifconfig packet errors

If "ifconfig" or "/proc/net/dev" shows you are getting packet errors and collisions, check that the network interface is not running at half-duplex. Full duplex would enable packets to flow in both direction in and out simultaneously.

ethtool eth0

To turn on full duplex:

ethtool -s eth0 speed 100 duplex full autoneg off

Verifying with `mii-tool eth0` should produce:

eth0: 100 Mbit, full duplex, link ok

Make this permanent by editing "/etc/sysconfig/network-scripts/ifcfg-eth0" and add:

ETHTOOL_OPTS="speed 100 duplex full autoneg off"

Apache LDAP Authentication and Require ldap-group

I was able to get htauth againt ldap and restricting against groups using:

<Location /protected>
    # Ldap auth access
    AuthType Basic
    AuthName "Restricted"
    AuthBasicProvider ldap
    AuthzLDAPAuthoritative on
    AuthLDAPURL "ldap://ldap.linuxweblog.com/ou=People,dc=linuxweblog,dc=com"
    Require ldap-group cn=web,ou=group,dc=domain,dc=tld
    AuthLDAPGroupAttributeIsDN off
    AuthLDAPGroupAttribute memberUid
</Location>

Here is what the ldap search entry looks like:

# ldapsearch -x 'cn=web'
# extended LDIF
#
# LDAPv3
# base <> with scope subtree
# filter: cn=web
# requesting: ALL
#

# web, group, linuxweblog.com
dn: cn=web,ou=group,dc=linuxweblog,dc=com
objectClass: posixGroup
gidNumber: 10002
cn: web
description: access to web protected folders
memberUid: user1

# search result
search: 2
result: 0 Success

# numResponses: 2
# numEntries: 1

It is essential to enter "AuthLDAPGroupAttributeIsDN off" and "AuthLDAPGroupAttribute memberUid" for it to get to the member attribute.

Reference: mod_authnz_ldap

Check for fake googlebot scrapers

I noticed a bot scraping using fake GoogleBot useragent string.

Here is a one liner that can detect the IPs to ban:

$ awk 'tolower($0) ~ /googlebot/ {print $1}' /var/www/httpd/access_log | grep -v 66.249.71. | sort | uniq -c | sort -n

It does a case-insensitive awk search for keyword "googlebot" from apache log file removing IPs with "66.249.71." which belongs to google and prints the output in a sorted hit count.

You can validate the IPs with:

IP=66.249.71.37 ; reverse=$(dig -x $IP +short | grep googlebot.com) ; ip=$(dig $reverse +short) ; [ "$IP" = "$ip" ] && echo $IP GOOD || echo $IP FAKE

Replace the IP value with the one you want to check.

Remote install CentOS-6 on RAID10 using SOFIns boot disk

What if you needed to install Raid10 and CentOS-6 on a remote, unformatted server but had no way of accessing the server? You could try asking someone at the remote location to help you bootstrap the server, but that is not always possible. You could make an onsite visit, but that is undesirable. KVM-over-IP and IPMI are hardware solutions, but are expensive and require network setup.

This tutorial demonstrates how to access a remote, unformatted server in a fast, secure, simple and inexpensive way. It will show how to remotely provision the server with Raid10 and CentOS-6.

We will use a remote access service from SOFIns (www.sofins.com) to boot the remote computer and set up a secure tunnel for ssh and vnc access. We will need someone at the remote location to insert a SOFIns boot disk into this server, attach power and network and then turn it on. That is all they are required to do. We can do the rest remotely.

SOFIns works by booting the remote server with a live Linux operating system. SOFIns creates a VPN tunnel between the remote computer and a SOFIns' gateway. We use the gateway to log into the live Linux operating system that has booted the remote server.

Here are the procedures to set up Raid10 with a CentOS-6 on a remote server that we access via SOFIns.

Remote login via SOFIns gateway

  • Register and login to "sofins.com".
  • Once signed in, enter "SOFIns Controls" and click on the icon "+A" besides "Unassigned" to create a new boot disk agent.
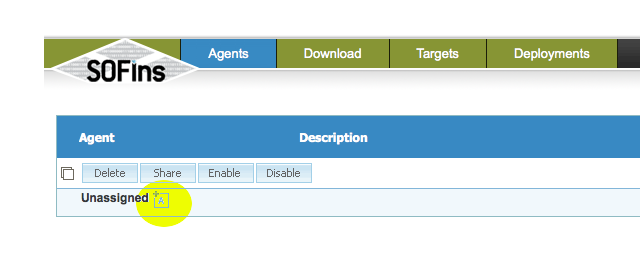
  • Select the checkbox besides the new agent that is created and click on the "Share" button.
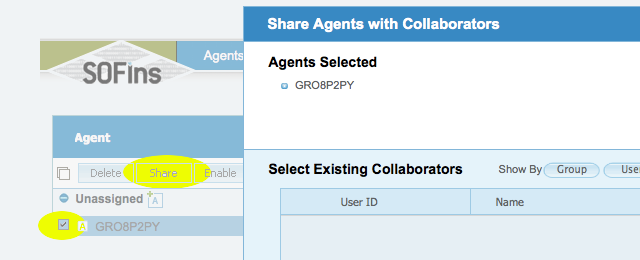
  • Enter email address of person to share the agent with and select "Offer assistance" tab and click "OK".
  • This will send out the invite, where the client accepts and downloads the iso and boots the server off of the CD created from the iso.
  • Once the client boots up the remote server, it will show up under the "Targets" page.
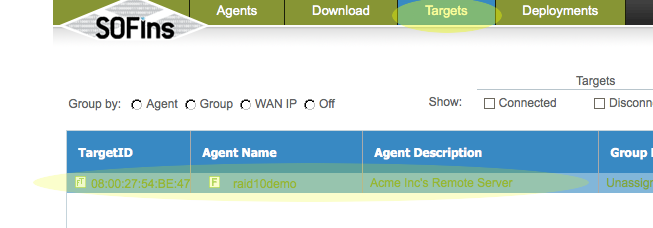
  • In The "Targets" page, click on the "Authorize Access" tab to "Enable" access and get the required ssh credentials to log in to the remote server via ssh.
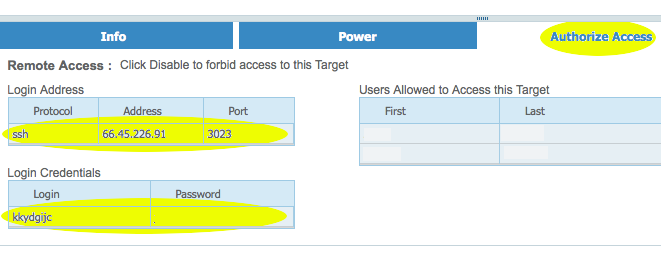
  • Login via ssh to the IP and port specified on the "Access" page.

mysql repair tables

With a recent OS upgrade, some of the mysql database tables got corrupted. Below is how I was able to get it repaired.

  1. Stop mysql server.
  2. Once mysql server is stopped, run a repair on all of *.MYI files via myisamchk:
    # myisamchk -r /var/lib/mysql/*/*.MYI
  3. Bring up the mysql server.
  4. Run a mysqlcheck of all databases via:
    # mysqlcheck -c --all-databases | tee /tmp/dbcheck.log
  5. Grep for "error" on the log and proceed to create a sql file to be run to repair the tables.
    # grep error -B1 /tmp/dbcheck.log | grep -v "error\|--" | sed 's/\(.*\)/REPAIR TABLE \1;/' >/tmp/dbrepair.sql
  6. The file output should be something like:
    REPAIR TABLE database1.table1;
    REPAIR TABLE database1.table2;
    REPAIR TABLE database2.table1;
  7. Log into mysql and source the repair script:
    # mysql> source /tmp/dbrepair.sql
  8. That should run and repair all of the corrupted tables. Verify by running another check and maybe an extended one.
    # mysqlcheck -c -e --all-databases

Syndicate content
Comment